
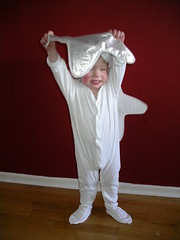
Of course all that hard work may not be appriciated!
Monday, 17 December 2007
Star costume tutorial - step 5 Connect the Two Stars
Now you have the two stars, put them face together with one point pointing downwards (so you have two points going upwards). The two upwards points will sit on the shoulders. Cut two pieces of elastic to approx the length you will need to sit across your tot's shoulders. Pin one to each of the two points on the first star. Now comes the dangerous bit - hold the first star against your tot with the silver side facing inwards (making sure the pins don't go into him/her), drap the elastic over their shoulders and place the other star (silver side inwards) on their back. Now pin the elastic to the second star to form should straps. Take the costume off your tot and sew these pieces of elastic in place.
You could stop there, but the costume will stay in place better if there is something to hold it in place around the waist, so cut another two pieces of elastic to the approx side needed. Pin them either side of the first star on the back and put the costume back on your tot inside out. Pin the other ends of the elastic to the back of the other star so it holds it comfortably around the waist. Take the costume off your tot again and sew the elastic in place.
Ta-dah! You have now finished your star costume.
An alternative if you have less time or material is to only make the one star and instead of having elastic shoulder straps, you could put a tie around the neck (like for an apron) and another one around the waist.
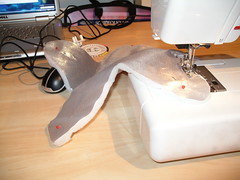
Star costume tutorial - step 4 pin together and sew front
Take one silver star and lay face down. Now lay a one of the interfacing stars on it followed by one of the batting stars. Pin the layers together securely then baste around the edges of the star to hold the layers together.
Now take the backing material star and place it on the silver material 'front to front', pin together and stitch round the edges leaving one edge open to turn the star the right way out. Once you've stitched round the edges, clip off any excess round the curves to reduce bulkiness (you can see pictures of how to do this in this bag tutorial from U-handbag: http://u-handbag.typepad.com/uhandblog/2007/03/rather_sexy_wri.html ). Once you done that, you can turn the star the right way out using your fingers or something pointy like a pen (with the lid on) to push out the corners.
Now fold the open edge over (so it's like the other edges) and pin it in place. Normally I would say give it an iron to keep it in place, but I tried that the first time and it melted the silver fabric DOH! I guess it'll depend on what type of fabric you are using. Now top sew all the way around the outside of the star to give it a nice neat edge.
Voila you have created your first star. Now repeat this all again with the second lot of star shaped materials to make the other star.
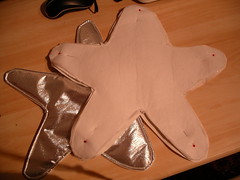
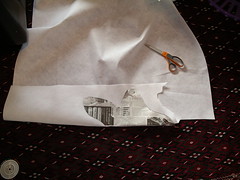
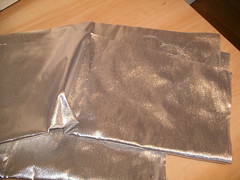
Star costume tutorial - step 3 Cutting out
Fold your shiny fabric the width of the folded pattern (see photo) and pin into place. Cut around carefully and repeat to give you two star shapes.
Repeat the process with the interfacing, batting and backing fabrics to give you two stars in each material.
Repeat the process with the interfacing, batting and backing fabrics to give you two stars in each material.
Star costume step 2 - making the pattern
First time I tried this, I drew the star free hand and it came out very wonky. By all means if you're great at drawing draw one free hand, but if like me you're rubbish at drawing here's how to come up with something reasonable looking.
First measure your tot that will be wearing the costume to get an idea of the overall size that you want it to be. Then take a piece of pattern paper (I just used newspaper) and fold it in half. Mark a centre point on the fold then draw a line straight up approx half your overall size. This forms your first point (this will be a 5 pointed star).
To get the positions of the other points take a protractor and measure an angle of 72 degrees (360/5 as there are 5 points) and draw a line the same length as the first one. Then repeat this again to give the third point. Then bisect (cut in half) each of these angles with a line that's about 1/3rd the size of the fist line. Draw from each of this points making it a bit curved to give a nice shape.
Cut out round the lines, unfold and voila you have your star shape.
Star Costume Tutorial Step 1
I thought I'd give you a simple tutorial to make a star costume based on the one I made my son for his nursery christmas show.
First off get your materials together. You will need:
shiny material in silver or gold
heavy weight sew in interfacing
batting
heavy weight backing material (I use a white cotton canvas)
thread
First off get your materials together. You will need:
shiny material in silver or gold
heavy weight sew in interfacing
batting
heavy weight backing material (I use a white cotton canvas)
thread
Saturday, 24 November 2007
New laptop
Woohoooo! I finally have my new laptop. We've also just go a wireless modem so I now should be able to access the internet unfetterd. No more fights with hubby on who's going to use the computer, so in theory at least I now have no excuse not to keep up with the blog a bit more. Of course I'll have to be careful otherwise I'll end up spending all my time on the internet and won't get any crafting done then!
Went into London shopping for the first time in ages today. Met up with a friend and dragged her through the haberdashery sections of Liberty - where I got some gorgeous buttons, John Lewis - where I got some silvery fabric to make my son a start costume for his first nursery christmas show (awwwwww!) and finally to McCulloch and Wallis where I got some cotton organdie to finish my corsage from the V&A course I went on.
Went into London shopping for the first time in ages today. Met up with a friend and dragged her through the haberdashery sections of Liberty - where I got some gorgeous buttons, John Lewis - where I got some silvery fabric to make my son a start costume for his first nursery christmas show (awwwwww!) and finally to McCulloch and Wallis where I got some cotton organdie to finish my corsage from the V&A course I went on.
Tuesday, 13 November 2007
Inaugural post
Well this is the first post of my new blog. Decided to start a new one a bit more in keeping with what I'm up to now. Hopefully I will be a bit better at keeping this one updated on a regular basis. There's a bit of work to do tidying it up and putting together a banner, but that's all to come. Watch this space.
Subscribe to:
Comments (Atom)
